• Youtube
  • Instagram
  • Twitter
  • BlogLovin

Saturday, July 21, 2018

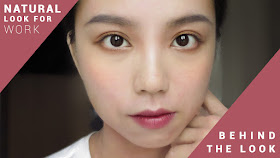
Natural Makeup For Work (Video Tutorial)

2 comments:
 
karman madokeki makeup turorial natural work
Is that how my face look like 0_0

Can't believe I actually filmed my first makeup tutorial in 2.5 years.

I've been away THAT long, always wanted to come back and make more makeup/beauty videos, but just never know when I can do it. I thought it would be a lot more smashing and exciting, but it was just like any other day in reality.

I have not reached that state where I dreamed of reaching - silky smooth, hydrated and problem free skin - I now question if perfection is actually achievable. Nonetheless, I am at a state where I'm happy with what I currently have, and have accepted it to be part of me (still working on it, but I'm doing so well now!). It's so strange to see myself in makeup again after so long. I've grown to really like my own face without makeup, and with some makeup on, it adorns my face so beautifully. It makes me feel great to be able to put makeup on once again!

So with the blemish and flaws that are still present on my skin, I present to you this makeup look which is one of the looks I've been wearing to work the past 2 months.
It's understated, natural, no perceivable eyeliner that set off alarms in most people's eyes.
I love how easy it is, I can put this look together within 15 minutes in the morning rush hour :'D If I don't mess up my brows that is. And I normally don't, so I don't know why I messed it up during recording!


This is the complete eye look, just really minimal. It looks even less obvious in video because the camera washes out some of the colour. In real life, it gives myself beautiful and natural looking depth. Indiscernible to the untrained eyes.

THE PRODUCTS


  1. E.L.F. Perfect Finish HD Powder
  2. KATE Mineral Powder Foundation (OC-C) 
  3. AVENE Very High Protection Cream SPF50+
  4. CANMAKE Mat Fleur Cheeks (04)
  5. KATE Brown Shade Eyes (BR-6)
  6. REVLON Matte Balm (225 Sultry) (Review and swatches here)
  7. MAYBELLINE Volum' Express The Magnum Waterproof
  8. KATE Lash Maximizer White
  9. INNISFREE Auto Eyebrow Pencil (03 Grey)
Compared to my old looks, this look has a lot less products, right? That's mostly because I just started getting back into wearing makeup recently, and I am really cautious this time. I don't want to put on too much just in case it might irritate my skin. So I start with very little products, and slowly add more to it if I want to. Who knows, maybe a few months down the road, the number of products I use will increase exponentially, trying to squeeze every single product from the new releases onto my face all at the same time? Hahaha!


The brushes I used are all from REAL TECHNIQUES (not TRUE TECHNIQUES hahaha). The purple brushes are from their Eye Makeup Starter Kit. Looks like the recently revamped it, kept the brushes the same and changed the case that comes with it (now grey instead of black!).


I've actually been looking at getting a new lash curler, but my old KOJI No.73 is still working fine.. Just need to change the rubber lining every so often because it does break apart, which affects the curl that I can get. Speaking of which, it's time I change to a new rubber lining.

As for the makeup brush cleaning sponge, I bought the sponge from a store that sells household products, cut it to fit the cute tin case my aunt gave me and it's done. Really handy for cleaning the brushes in between different colours, especially when going from dark to light shades. The excess powder collects at the bottom which I then clean out once in a while. Time to wash the sponge soon, it's getting brown!

All in all, I am really glad I can do this again. Even though this gratitude is an afterthought, I still want to note it down. It really helps to reflect upon all that have happened in my life and to count my blessings. Even though things aren't exactly at where I want them to be, I'm still rejoicing at how far I've come, and how much improvements I've experienced. I will continue to keep my body, mind, and skin healthy, and hope to bring more videos with you all.

And now, the video tutorial.


Sunday, July 1, 2018

InstaNatural Niacinamide Serum (Review)

1 comment:


My encounter with Niacinamide happened by chance. My cousin was telling me about wanting to try a Vitamin B3 serum, I got curious and read the research and journals to see what's good about it.

Turns out it seems to be really suitable for me as it calms inflammation, redness, and promotes skin barrier function - pretty much what I think I need as I notice my skin being thinner and more sensitive over the years. It turns red very easily from temperature fluctuation, get tiny little bumps that itch if it is irritated, and what I dislike the most - gets blotchy and rashy.

The serum my cousin got is extremely expensive in my books, about USD35 for 10ml (at 13% concentration). I did some searching on iHerb not having much hopes, but I found something within my price range!!


The InstaNatural Niacinamide Serum goes for USD14.03 for 60ml. It has a concentration of 5%, which is the recommended level for therapeutic effects to take place without causing too much irritation to the skin. Considering my skin is already more vulnerable, I thought a lower concentration works well for me, as 13% is an overkill, and might even cause more harm than good on my skin.


They do have a warning on the side of the bottle that if it causes any irritation, you should stop using it. But did that stop me? Hell no! In fact, the first few days I used it, it stung my face a little bit. That is when I realize it's still too strong for my face - or my face is too fragile for it. Solution? I mixed in 1-2 drops into my facial cream, mix well and applied onto my face. No more issues after that.


There's also suggested directions on the bottle. The gist is to apply it onto clean skin so maximum absorption. The serum actually absorbs pretty damn quickly so you don't have to wait forever before applying your moisturizer. Or you could do it like me, mix it with the moisturizer! Genius! BUT doing that will definitely lower the concentration of the Vitamin B3, so probably don't do it if you can tolerate the 5% concentration, and want results fast.


The serum itself is whitish in colour. Spreads and absorbs quickly. Yada yada. Nothing special about it's texture, however I'd like to highlight it has a soft lavender scent which I really enjoy. It's very soft and nothing offensive or long lasting.

Apologies as I do not have before and after photos. I can only tell you over the 2-3 months I've been using it, I noticed a slow but slight improvement in my face. It's less blotchy, less rashy, and less red in general. The good days are longer and bad days relatively shorter. I still have a long way to go though!

I can't be sure if it's just because of this B3 serum alone, or the combined effects of using the Avene Skin Recovery Cream, but I like it enough to repurchase it because I believe in it. USD14 for 60ml is a very reasonable price and I'd like to keep it in my routine until I find something better.

Definitely gonna be a repurchase item.
 
© 2012. Design by Main-Blogger - Blogger Template and Blogging Stuff. Customised by Karman 2014.