6 K-pop Inspired Korean Style Eyeliners Tutorial
hanggggg on. haven't i already done an eyeliner tutorial before already? why do some of them look eeriely similar? well, that's because.. just how many different styles of eyeliner can there be!? and no, i'm not trying to cheat another post or video here. i've done this video with selected k-pop artistes in mind, so this differs slightly from my 10 daily eyeliner looks tutorial.
like i said, this video is with respect to a few kpop singers like IU, suzy, sandara park, and sohee. i thought this would make it easier for you all to refer to, you know, much alike the plastic surgeon's office where they hear stuff like "i want XXX's eyes and nose.". now, you can tell me "i want XXX's eyeliner!".
watch the video here!
PRODUCTS USED_______________________________________________________

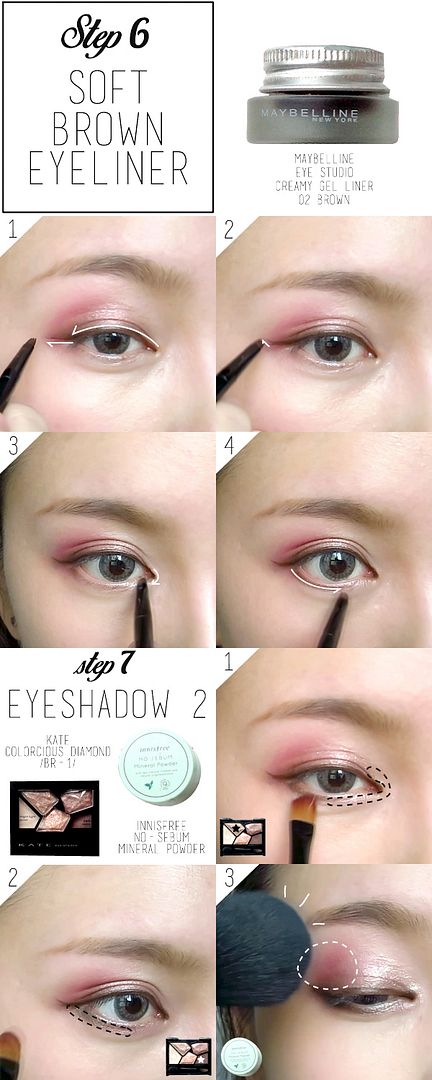
eyeliner: maybelline eye studio lasting drama gel liner (black) and it's accompanying brush.

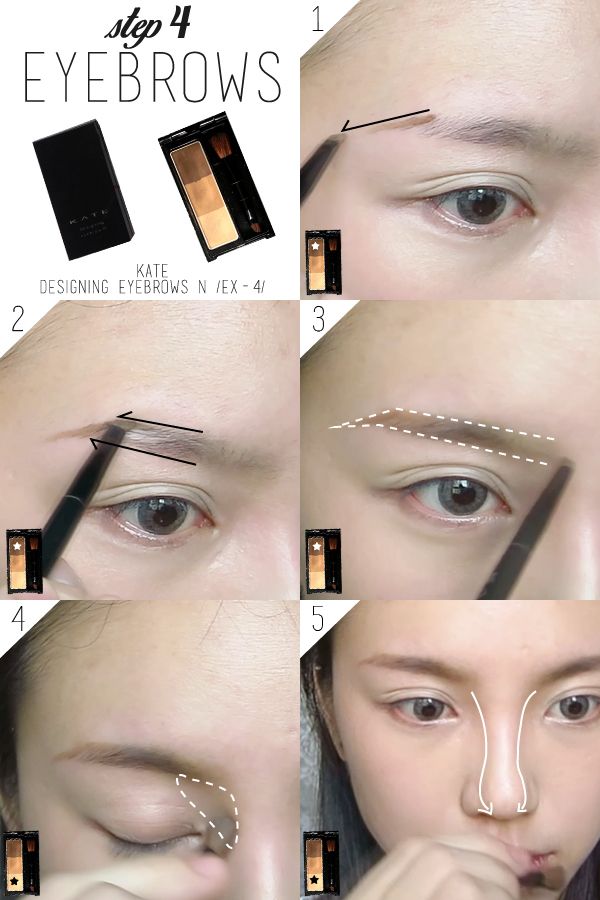
matte brown shade: kate designing eyebrow N (EX-4)
PICTORIALS_____________________________________________
here are the pictorials for the 6 different eyeliner looks i've done in my video, complete with annotations and markings!
-ONE-
iu's natural eyeliner.
iu's eyes are naturally lifted upwards slightly, so this look completements her eyes a lot as it seeks to balance the upward lift. the key idea is to make the end of the eyeliner end on the same horizon where your inner corner is lying on. koreans are all about smiley moon shaped eyes, this is one way to get it.
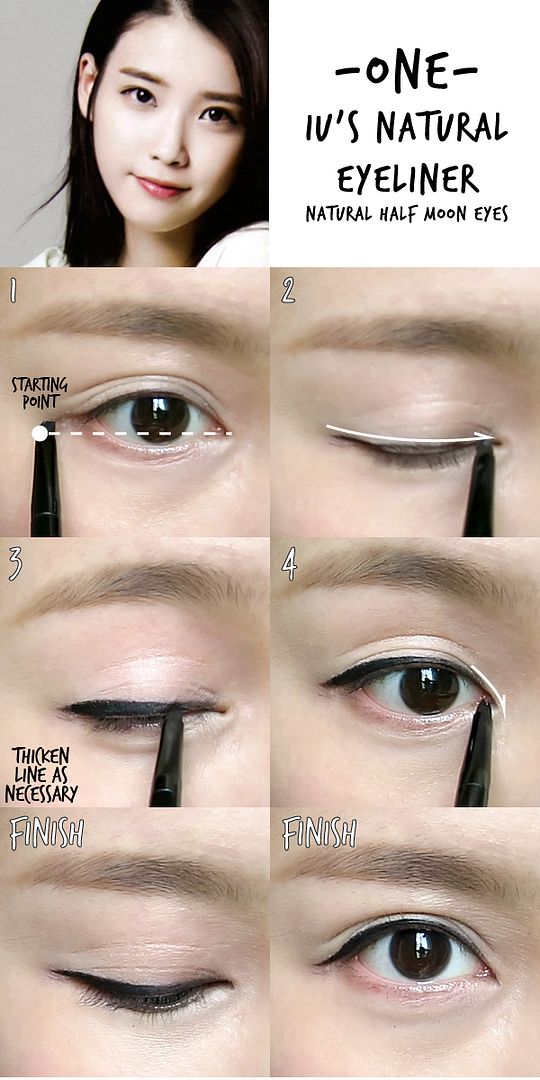
click on image to enlarge slightly!
-TWO-
iu's slightly jazzed up moon shaped eyes. this isn't a good reference photo but i couldn't find one that's large enough to show her eyeliner. she did something like a inward flick to force the appearance of a moon shaped eyes. you'll see what i mean in the pictorial below.
this is also the look i wore for my "5 ways to get a korean gradient lips" video. a few viewers requested for the tutorial on that look to my surprise - i didn't think this look suited me very well. but, to each its own.

step 2 requires you to draw a horizontal line from the end of the upper line until it hits the lower lash line. then elongate it as necessary in step 3.

click on image to enlarge slightly!
-THREE-
suzy's smiley eyes. i think the photo below is most illustrative of what i mean by the half moon eyes, when they smile the eyes take the shape of a half moon! the use of matte brown shadow on the lower lash line helps to create the same effect the black eyeliner does in the previous look, but it looks much softer and natural.

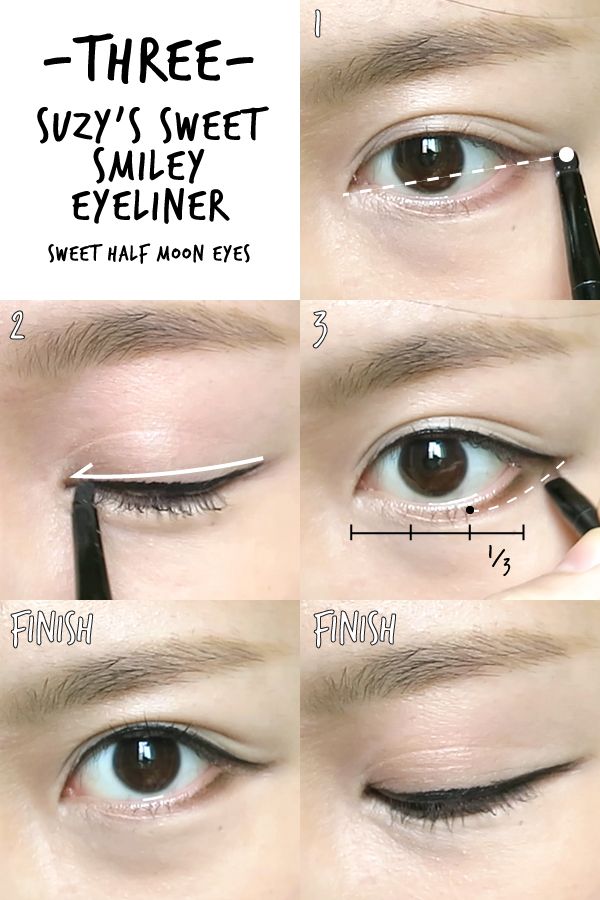
click on image to enlarge slightly!
-FOUR-
sandara's classic kpop eyeliner, which is also the classic cat eyes that a lot of kpop artiste sport since they share similar eye shapes.
as with all my other cat eyes, always squint your eyes to use the lower lash line as a guide to get that gentle flick. if you prefer a stronger angle, keep your eyes wide open instead.
the key is in step 3, making sure the line that connects the end of the eyeliner to the 1/3 point of the lash line is straight.
i didn't line my lower water line, but you can do it for the added kpop flavour.

click on image to enlarge slightly!
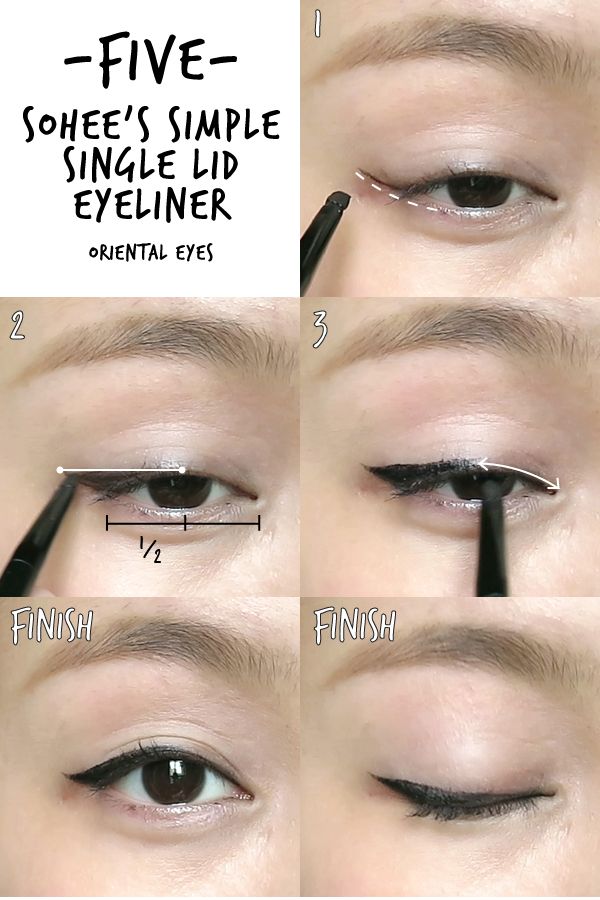
-FIVE-
sohee's look are perfect for single eyelids! i love her oriental eyes, it's rare these days because most koreans do go under the knife to get double lids. hey, it's an open secret, right?
the key is to make sure the inner half of the eyeliner is still barely visible when your eyes are open. it necessary, make markings with the eyes open to know how thick your eyeliner needs to be.

click on image to enlarge slightly!
-SIX-
another sohee's eyeliner look! this is more winged out and makes the eye look longer. again, the trick here is to draw a straight line from the end of the liner to the center of the lids.

click on image to enlarge slightly!
this is probably the last makeup video that i'll post in the near future. i've made an announcement in my video (after the tutorial). if you didn't see it, it's okay. i'll be back after my skin heals :) in the mean time, i'll probably be posting more about makeup news and other things that are still related to makeup, but doesn't require my skin :)
i hope this tutorial was useful!
leave me a comment below on who's eye look should i dissect and explain next time!