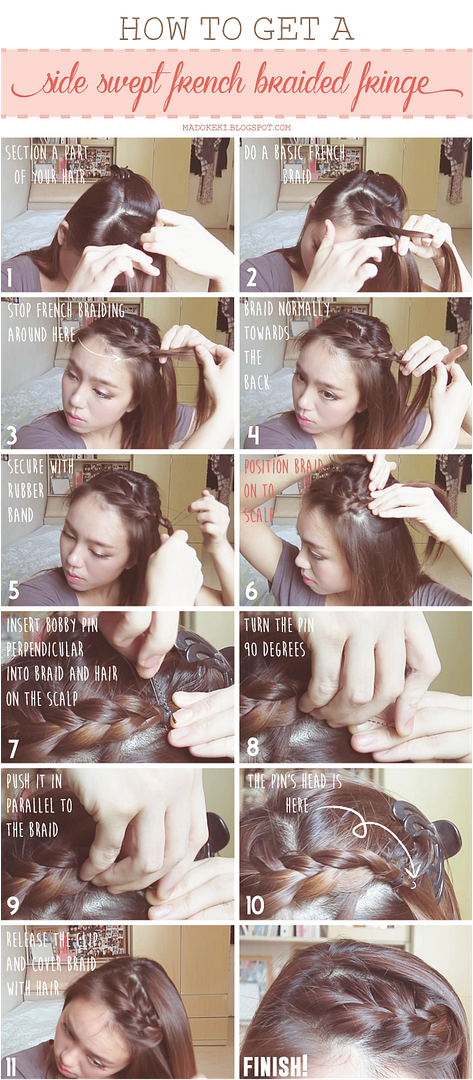
Side Swept French Braided Fringe/Bangs
i can't say i invented this look, because clearly, i didn't, as i'm not the first to have come up with such a look, but i'm proud to say i've perfected it over the years to be able to get this hair done within 3 minutes (if i'm lucky). this look is different from the conventional french braided fringe as most people braid it all the way down, but i strive to be different - i tuck it underneath part of my hair. this imparts a certain volume to the side of my head that i could totally use, and it helps the braid stay slightly above my scalp to add to the voluminous look.
not only does this add volume to my hair, it adds THIS MUCH cuteness to it, making a boring hair become interesting effortlessly. plus, who doesn't like braids? it's so romantic!
this hair will work for both long fringe and short bangs as it's french braid style. the reason why i even did this hairstyle in the past was to get past the awkward "not short bangs, not yet a long fringe" stage.
watch the video tutorial now if you haven't already!
and for those who step by step visuals, here's a series of screen shots i did to help you see better at your own pace :)

i think there are three main techniques here that would take more practices to perfect,
the first is learning how much strength to use when french braiding so that the hair will not stick to the head like magnets. i actually use very little force and try to get the braid to be as loose as possible, because loose braids is what makes it looks more romantic.
the second being the change in direction from the "down the side of the face" to "towards the back of the head", the force required to tug each of the 3 sections will differ slightly according to the curvature of the braid at that section, i can try my best to explain but i know it'll just confuse you eventually. don't worry about this, because if the braid turns out to be slightly lopsided after you conform it to this direction, you can always fix the stray hair with bobby pins :) so do not panic!
the last would be the twist and push technique i used to insert the bobby pins into the hair. this took me a lot of practice, but once you manage it it'll be very instrumental in the rest of your life as a bobby pin works wonders if used appropriately. the gist is to secure the braid to the hair that's not part of the braid. those hair acts like foundations which the braid and bobby pin hold onto. this technique is worth a video on its own.
let me know what you think!
xoxo
karman
hope you like this tutorial and found it useful!


No comments:
Post a Comment